How to make audio files for osu!
Since osu! is a rhythm game, it's important that your audio files are the highest quality they can be. This makes it easier to hear instruments in the song, which helps with both mapping those sounds and playing them in-game.
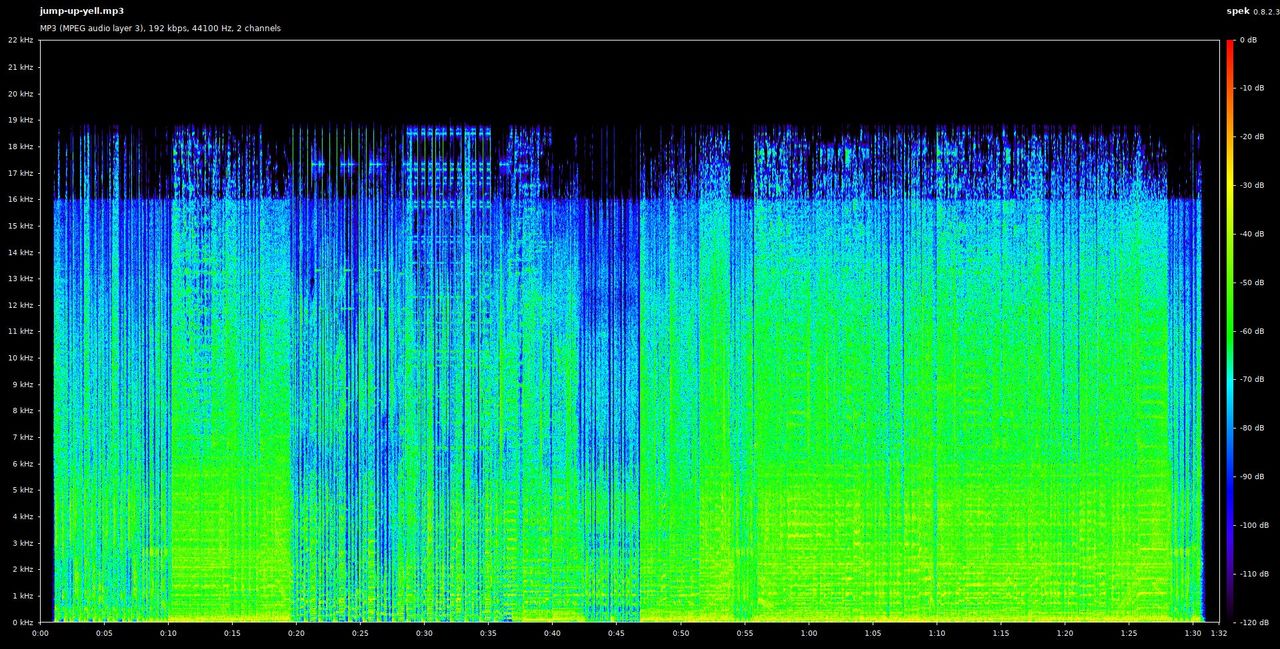
Above is an example of an mp3 that was encoded from a lossless source. By the end of this guide, you'll be able to:
- Create high quality mp3 encodes
- Determine the audio quality of any file
- Tell when an mp3 is a "fake mp3" or when a flac is a "fake flac"
- Know when to encode at 128kbps versus 192kbps
- Verify that a 192kbps mp3 is actually 192kbps
Before we begin
Before we start, let's define a little terminology.
- An audio format can either be uncompressed lossless, compressed lossless, or lossy.
- You want to store compressed lossless (such as .flac) in all cases, since it will be the same quality as uncompressed lossless (.wav) but smaller in file size.
- Lossless files store the original data. It's the highest quality you can get it, but at the cost of being large in file size.
- Lossy files are smaller than lossless files since we remove some of the original data (such as frequencies that people may not differentiate) in order to decrease file size.
An important takeaway is the following:
- If you start with a lossy source (such as an mp3), then no matter what you do with it, you'll never be able to achieve higher quality than the original data (such as a flac)
- Saving a 128kbps audio source as 192kbps increases file size (since there are more kilobytes per second, hence kbps) but does not increase quality.
To guarantee the maximum possible quality, you should always transcode from a lossless source (such as wav or flac). If you have a 320kbps mp3 or other lossy source, it's possible to create a 192kbps mp3 with it, but your version will always be lower quality than a lossless to lossy transcode.
Introducing Spek
Spek is an Acoustic Spectrum Analyzer that enables us to verify the quality of any file that contains audio (including videos with audio, such as downloaded YouTube videos).
The original author of Spek stopped maintaining it, so I recommend using the fork spek-alternative in all cases. It includes many new features such as being able to hide a file's full path. You can download it here.
Elementary Spectral Analysis
Spectral analysis enables us to visually examine the quality of an audio file. Before we start performing spectral analysis, let's review some music theory first.
Every note in music has a specific frequency; lower notes have lower frequencies and higher notes have higher frequencies.
When looking at a spectral diagram (commonly simplified to just "spectral" or "spectrogram"), all of the frequencies in the audio file are displayed as a graph.
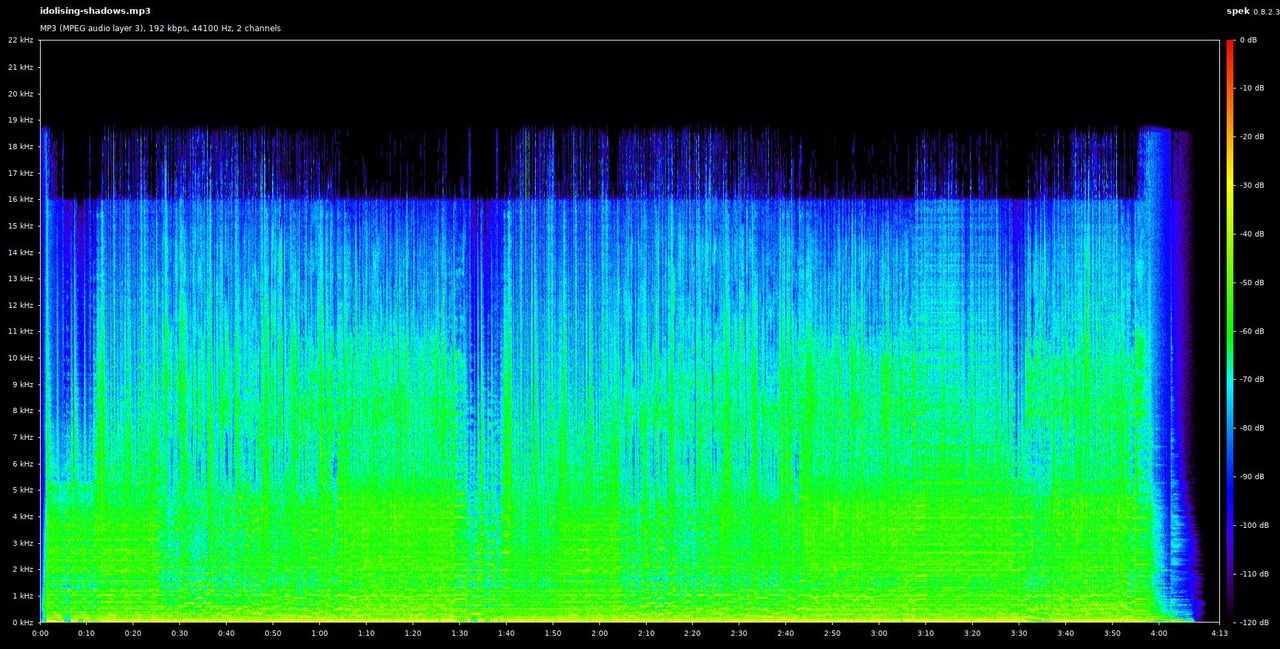
Here you can see that time is on the x-axis and frequency is on the y-axis. In other words, a spectral is a way to visualize frequency (kHz) versus time (mm:ss).
Note that different music genres will have different looking spectrals (since the frequencies used in e.g. a calm piano song will be different than an energetic pop song). When analyzing spectrals, any data at all for those frequencies is the most important thing.
It is generally believed that humans have a hearing range from around 20Hz to 20kHz. Why is this important? Consider the following:
- Lossless songs have frequencies that extend up to 22kHz.
- 320kbps MP3s have a frequency cut-off at 20.5kHz.
- 192kbps MP3s have a frequency cut-off at 19kHz.
- 128kbps MP3s have a frequency cut-off at 16kHz.
In summary, when we transcode a lossless source to a 192kbps mp3, what we are doing is lowering the frequency cut-off. Put another way,
When transcoding an audio file from e.g. a flac to a 192kbps mp3, what we are doing is lowering the audio quality by getting rid of the extra kHz that humans are generally unable to notice.
This leads us to the concept of transparency:
A lossy transcode where humans are unable to tell the difference between it and the lossless version is considered transparent. For most people, a 192kbps MP3 is a transparent transcode.
Look again at the spectral from above. You may have noticed that it has a frequency cut-off at 19kHz, which means that this is a real 192kbps mp3.
"But wait!" you may exclaim. Why is there so much stuff at 16kHz?
Good question. The answer is MP3s tend to have a "shelf" at 16kHz, so most of the frequencies will lie there.
Advanced Spectral Analysis
Now that we understand how spectrals work at a fundamental level, it's time to use that knowledge to determine the quality of audio files.
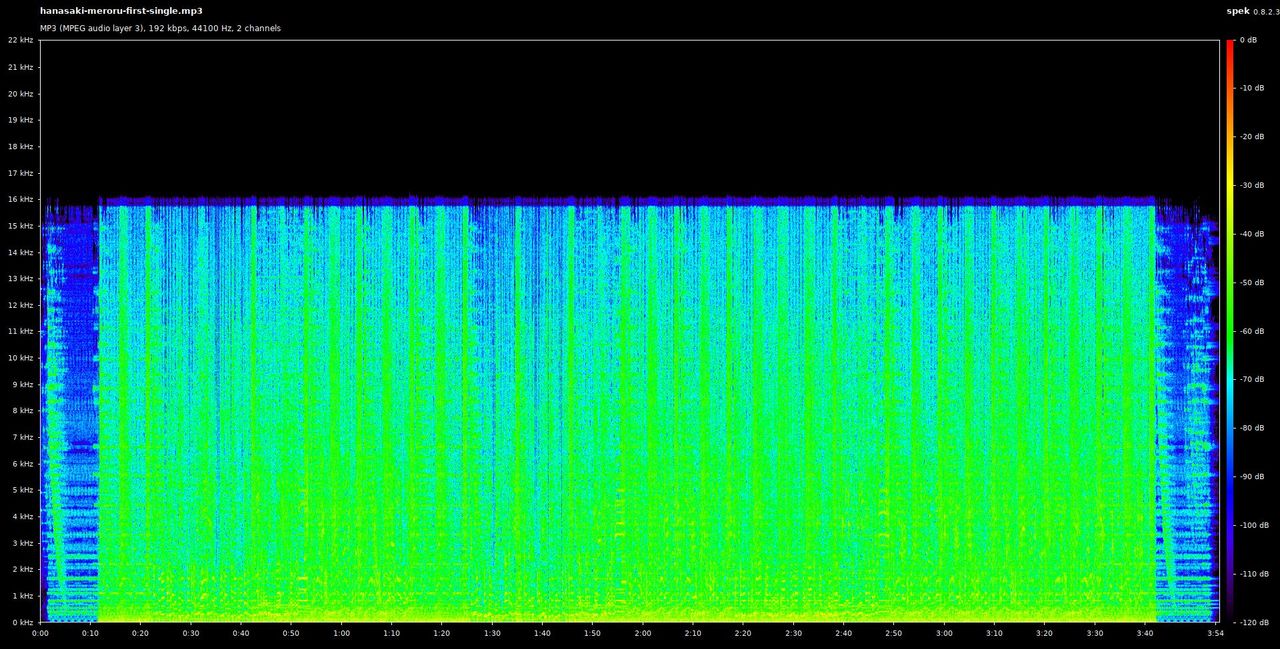
Consider the spectral from above. Is it a real 192kbps mp3?
Click here to see the answer
The answer is no! Recall that 192kbps MP3s have a frequency cut-off at 19kHz.
Since this MP3 doesn't go up to 19kHz, it is not a real 192kbps MP3.
Note that what this mp3 does do, however, is go up to 16kHz. That means that this mp3 is the same quality as a 128kbps mp3 but encoded as 192kbps, which results in higher file size (kbps) without increasing quality (kHz).
Why is this important? You'll find out in the next section!
Making audio files for osu!
Now that we understand how audio quality works, we can use this knowledge to guarantee that our audio files will always be the highest quality they can be.
Step 1: Finding an audio source
The first step to creating a high quality audio file for osu! is to find an audio source that is high quality. You ideally want a lossless audio source such as a flac or wav.
A lossy to lossy encode results in lower quality than a lossless to lossy encode, which is why you want to avoid converting a 320kbps mp3 to a 192kbps mp3.
You can find lossless music on websites like Bandcamp (English music) and Ototoy (Japanese music). In general, you want to find out where an artist is distributing their music and see if there are lossless (wav, flac, CD/DVD, etc.) options available.
If you need help finding lossless music (or music sources in general), try searching online forums for what people generally recommend.
Note that in the past YouTube wasn't considered a high quality audio source, but now that YouTube supports the Opus audio format, downloaded YouTube videos can have an audio quality higher than 19kHz, if you download them the right way.
For downloading audio from YouTube in the best quality available I recommend using yt-dlp. Note that yt-dlp automatically downloads the best video and audio formats available, then merges them together, so you don't need to pass additional parameters to it.
yt-dlp 'https://www.youtube.com/watch?v=Tp6Njbegics'At this point you should have your audio source. Once you do, it's time to move on to the next step.
Step 2: Verifying the quality of the audio source
We just downloaded an epic audio file, but we don't know if we're getting ripped off and the audio file isn't the original data. It could also be the case that the best quality available isn't that good. In any case, we need to verify just how "HD" our audio is before we perform a transcode on it.
This is where Spek comes into play. We'll use Spek to perform a spectral analysis on the audio we downloaded, so we can determine just how high quality it actually is.
Note: If you're already downloading music from a source you trust, then you won't have to verify audio quality in most cases. It's nice to know with certainty that your audio is high quality though.
The example below uses Spek to verify the audio quality of the YouTube video from above:
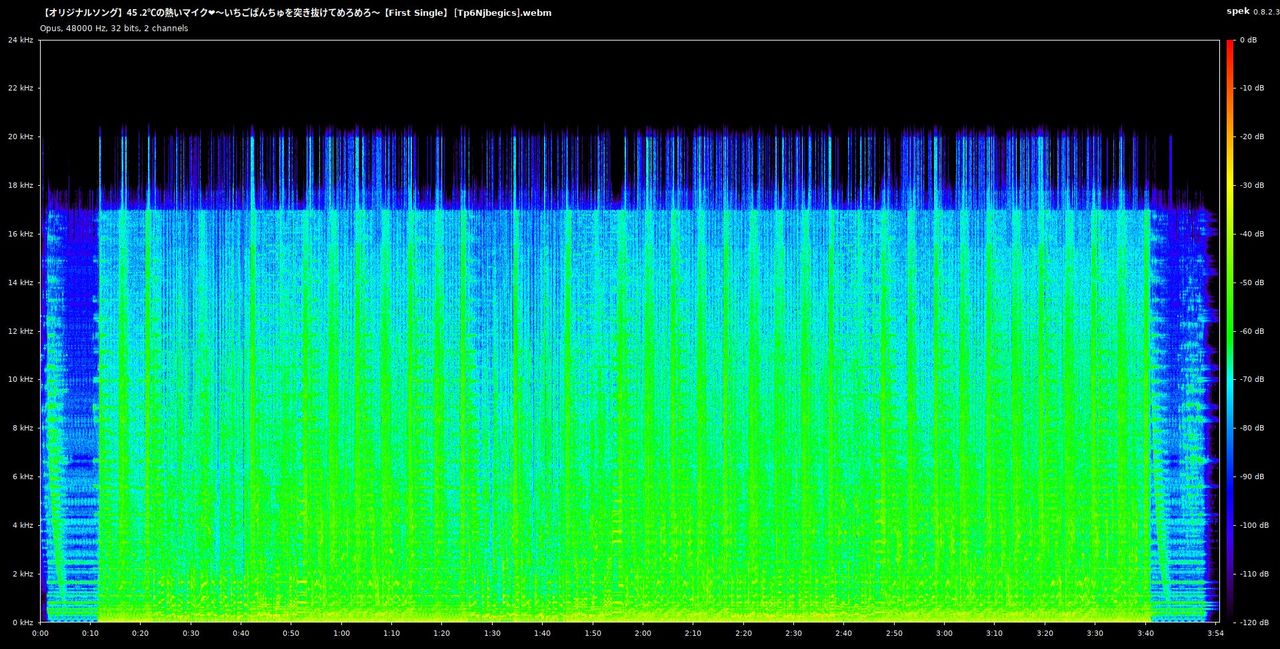
Note that the frequency goes up to 20kHz, which means that the YouTube audio is higher quality than a 192kbps mp3!
What this means is that even though we'd perform a lossy to lossy transcode, we'll still be able to create real 192kbps mp3s with YouTube sources!
Remember that if your audio source is actually lossless, your audio file should be higher quality than the one above (going up to 22kHz). Here's an example of a real .flac (lossless):
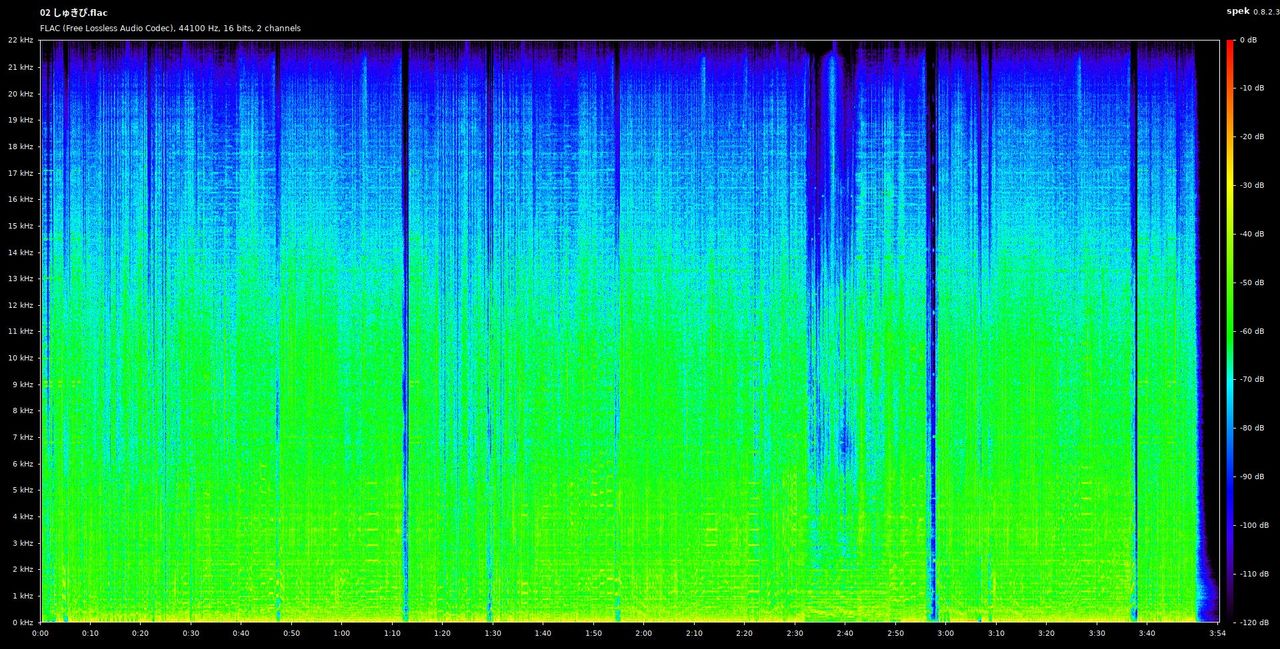
See the difference? Even though the YouTube audio is higher quality than a 192kbps MP3, a lossless source such as a .wav (uncompressed) or .flac (compressed) will always give you the highest possible quality (usually 22kHz), assuming it's legit.
Now that we know just how HD our audio actually is, it's time to transcode it into an mp3 file for osu!
Step 3: Transcoding the audio into an mp3 file
Now that we have a high quality audio source, it's time to transcode that audio into an mp3 that osu! can use. To achieve this, we'll use the best tool for the job, ffmpeg.
ffmpeg -i input.flac -vn -acodec libmp3lame -ac 2 -ab 192k -ar 44100 output.mp3Above takes an input.flac and creates an output.mp3 with an audio bitrate (-ab) of 192kbps, audio sample rate of 44100Hz (44.1kHz) (-ar), and 2 audio channels (-ac) with the libmp3lame audio codec and removes video codecs (if any) with -vn.
"But wait! What is all this audio stuff?" you may be asking. Let me explain.
- libmp3lame is the codec we're using, which is basically the instructions we use to create the mp3. You may have heard of LAME before. It's the same thing.
- We're transcoding to 192kbps since our audio source is higher than 19kHz. Note that if your audio source is lower quality, such as 16kHz, you'll need to transcode to 128kbps instead (otherwise it'd be a fake 192kbps).
- We want 2 audio channels since we want our output audio to be stereo (that is, having separate channels for the left and right audio, useful for listening to music with headphones).
- The sample rate limits the highest frequency the audio file can contain. 44100Hz is the standard sample rate used for audio files since it limits the frequency to around 20kHz, which is less than the frequency in our 192kbps mp3.
- The -vn is there so we don't copy the video stream when working with video sources. If it helps, you can remember -vn as "Video? NO!", which also has the benefit of removing the cover art to save space.
Now that we understand what's going on, we can simplify the command above.
When we tell ffmpeg to create an out.mp3, it already knows that we're using libmp3lame, so we can get rid of -acodec:
ffmpeg -i input.flac -vn -ac 2 -ab 192k -ar 44100 output.mp3We can also get rid of -ac 2 and -ar 44100 if we know our audio files have 2 channels and have a sample rate 44.1kHz. Here's the result:
ffmpeg -i input.flac -vn -ab 192k output.mp3This works well for most audio files, but you may want to specify the audio channels and sample rate to ensure that even the weirdest audio sources transcode properly.
The spectral below is a result of transcoding the FLAC from above into a 192kbps MP3:
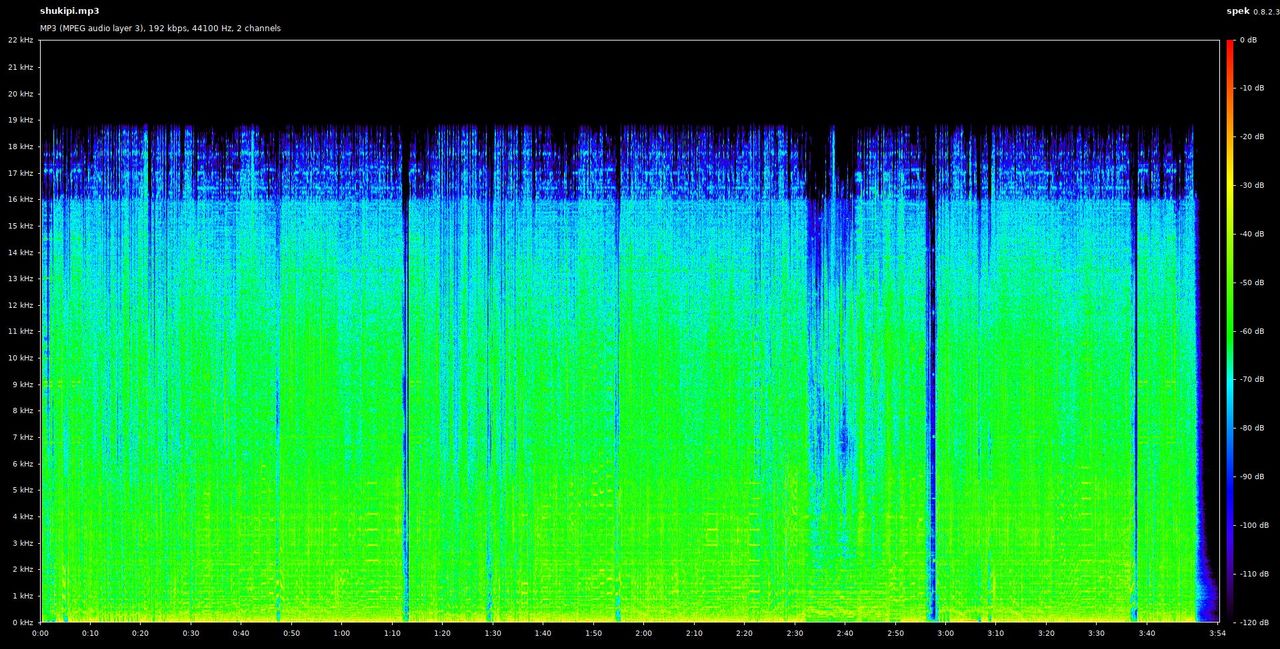
Recall what you learned about audio frequencies. Is this a real 192kbps mp3?
Click here to reveal the answer
The answer is yes! 192kbps MP3s have a frequency cut-off at 19kHz, and this MP3 is no exception.
Now that we have transcoded our audio source into a proper 192kbps mp3 for osu!, we're done! You may now map with pleasure knowing that your audio source is the highest quality it can get, and can post a picture of Spek in the discussion to help potential nominators.
Advanced Cases
Here are some advanced cases that you may encounter while creating audio files for osu!
Making the audio file louder
Sometimes the original audio source isn't mixed properly, such as when the audio source comes from a video (like the TV size version of an anime opening) and not an official music release.
In this case, we first need to determine the amount of decibels (dB) to amplify by. For this task, we'll use Audacity.
Once you open the file in Audacity, use Ctrl+A to select the entire audio stream. Then, click "Effect" in the menu bar followed by "Amplify". You should see a dialog box like this:
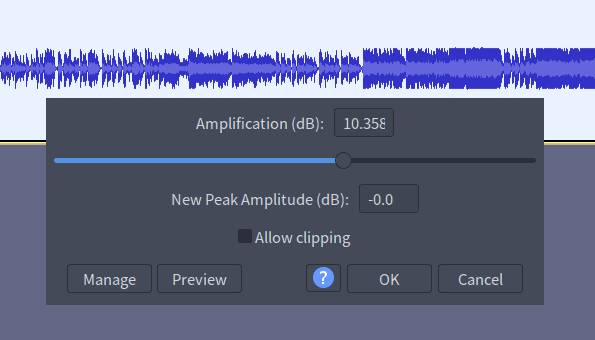
By default, the Amplification (dB) value will be the maximum amplification possible without clipping, which prevents the audio from sounding worse after increasing the volume.
Now all we have to do is take this amplification value and add it to our ffmpeg command, like so:
ffmpeg -i anime-op.mkv -vn -ac 2 -ab 192k -ar 44100 \
    -filter:a "volume=10.358dB" anime-op.mp3
The key here is the -filter:a parameter. With it, we're telling ffmpeg to amplify our audio source by the specified amount.
Note that you should always perform the amplification on the original audio source and not an mp3 you already transcoded, since a lossy to lossy transcode will always result in lower quality than a lossless to lossy one.
Frequently Asked Questions
Here are some frequently asked questions that mappers have when it comes to audio in osu!
Why doesn't the audio preview work?
This is because the MP3 file used for the mapset isn't a real MP3 file. To verify this, open the mp3 file with Spek. You should see something like this:
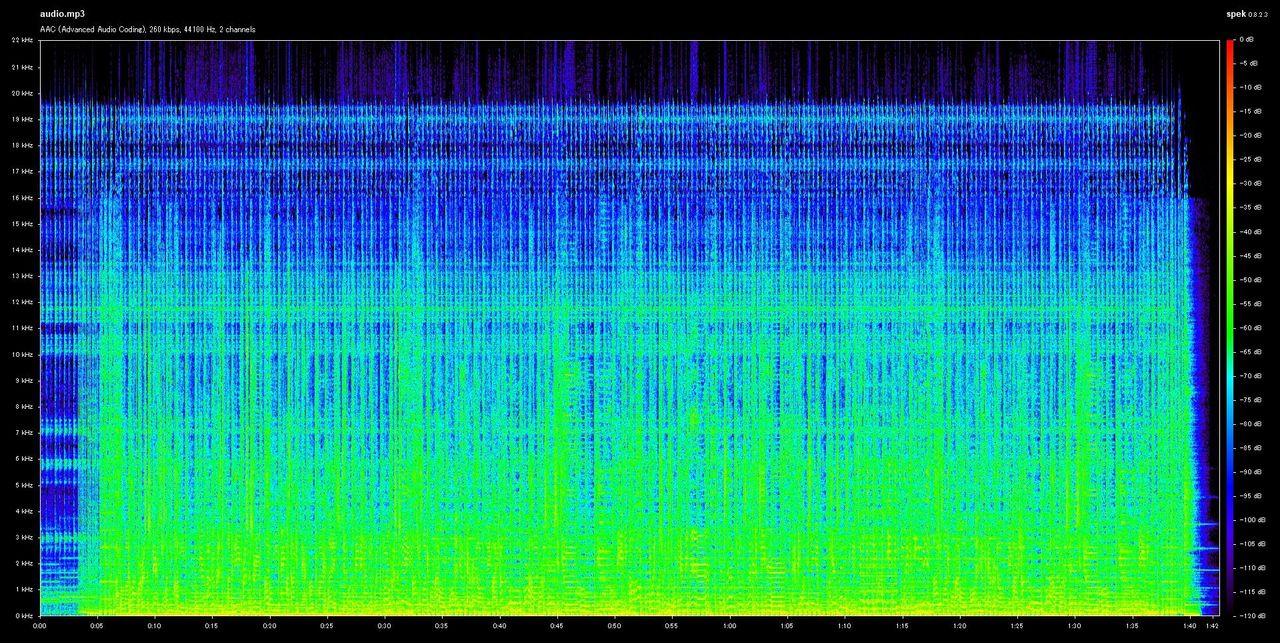
Below the audio name you can see that the audio coding format for this file is Advanced Audio Coding (AAC), which you'll typically find from iTunes purchases (which are generally .m4a files).
To fix this, you'll need to replace the audio file in your song folder with a proper mp3. Note that you'll have to wait around a week for the audio preview on the website to be updated.
Published: December 11, 2021
Last Updated: August 22, 2022
